#' Add together two numbers
#'
#' @param x A number.
#' @param y A number.
#' @returns A numeric vector.
#' @examples
#' add(1, 1)
#' add(10, 1)
add <- function(x, y) {
  x + y
}16 Function documentation
In this chapter, you’ll learn about function documentation, which users access with ?somefunction or help("somefunction"). Base R provides a standard way of documenting a package where each function is documented in a topic, an .Rd file (“R documentation”) in the man/ directory. .Rd files use a custom syntax, loosely based on LaTeX, and can be rendered to HTML, plain text, or pdf, as needed, for viewing in different contexts.
In the devtools ecosystem, we don’t edit .Rd files directly with our bare hands. Instead, we include specially formatted “roxygen comments” above the source code for each function1. Then we use the roxygen2 package to generate the .Rd files from these special comments2 . There are a few advantages to using roxygen2 :
Code and documentation are co-located. When you modify your code, it’s easy to remember to also update your documentation.
You can use markdown, rather than having to learn a one-off markup language that only applies to
.Rdfiles. In addition to formatting, the automatic hyperlinking functionality makes it much, much easier to create richly linked documentation.There’s a lot of
.Rdboilerplate that’s automated away.roxygen2 provides a number of tools for sharing content across documentation topics and even between topics and vignettes.
In this chapter we’ll focus on documenting functions, but the same ideas apply to documenting datasets (Section 7.1.2), classes and generics, and packages. You can learn more about those important topics in vignette("rd-other", package = "roxygen2").
16.1 roxygen2 basics
To get started, we’ll work through the basic roxygen2 workflow and discuss the overall structure of roxygen2 comments, which are organised into blocks and tags. We also highlight the biggest wins of using markdown with roxygen2.
16.1.1 The documentation workflow
Unlike with testthat, there’s no obvious opening move to declare that you’re going to use roxygen2 for documentation. That’s because the use of roxygen2 is purely a matter of your development workflow. It has no effect on, e.g., how a package gets checked or built. We think the roxygen approach is the best way to generate your .Rd files, but officially R only cares about the files themselves, not how they came to be.
Your documentation workflow truly begins when you start to add roxygen comments above your functions. Roxygen comment lines always start with #' , the usual # for a comment, followed immediately by a single quote ':
TipRStudio
Usually you write your function first, then its documentation. Once the function definition exists, put your cursor somewhere in it and do Code > Insert Roxygen Skeleton to get a great head start on the roxygen comment.
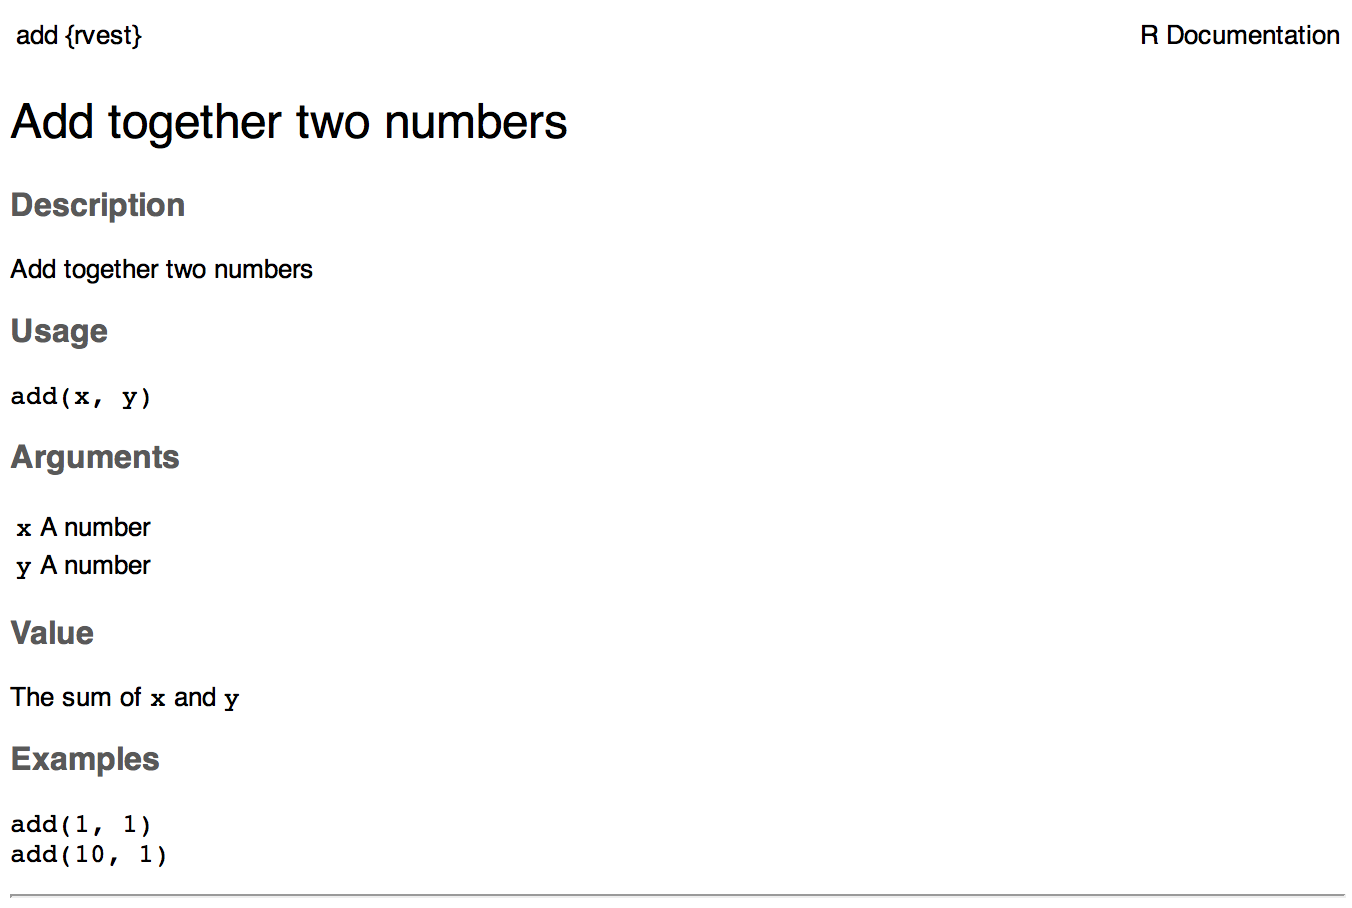
Once you have at least one roxygen comment, run devtools::document() to generate (or update) your package’s .Rd files3. Under the hood, this ultimately calls roxygen2::roxygenise(). The roxygen block above generates a man/add.Rd file that looks like this:
% Generated by roxygen2: do not edit by hand
% Please edit documentation in R/add.R
\name{add}
\alias{add}
\title{Add together two numbers}
\usage{
add(x, y)
}
\arguments{
\item{x}{A number.}

\item{y}{A number.}
}
\value{
A numeric vector.
}
\description{
Add together two numbers
}
\examples{
add(1, 1)
add(10, 1)
}
TipRStudio
You can also run devtools::document() with the keyboard shortcut Ctrl/Cmd + Shift + D or via the Build menu or pane.
If you’ve used LaTeX before, this should look vaguely familiar since the .Rd format is loosely based on LaTeX. If you are interested in the .Rd format, you can read more in Writing R Extensions. But generally you’ll never need to look at .Rd files, except to commit them to your package’s Git repository.
How does this .Rd file correspond to the documentation you see in R? When you run ?add, help("add"), or example("add"), R looks for an .Rd file containing \alias{add}. It then parses the file, converts it into HTML, and displays it. Figure 16.1 shows how this help topic would look in RStudio:
Warning
R CMD check warning
You should document all exported functions and datasets. Otherwise, you’ll get this warning from R CMD check:
W  checking for missing documentation entries (614ms)
  Undocumented code objects:
    ‘somefunction’
  Undocumented data sets:
    ‘somedata’
  All user-level objects in a package should have documentation entries.
Conversely, you probably don’t want to document unexported functions. If you want to use roxygen comments for internal documentation, include the @noRd tag to suppress the creation of the .Rd file.
This is also a good time to explain something you may have noticed in your DESCRIPTION file:
Roxygen: list(markdown = TRUE)devtools/usethis includes this by default when initiating a DESCRIPTION file and it gives roxygen2 a heads-up that your package uses markdown syntax in its roxygen comments.4
The default help-seeking process looks inside installed packages, so to see your package’s documentation during development, devtools overrides the usual help functions with modified versions that know to consult the current source package. To activate these overrides, you’ll need to run devtools::load_all() at least once. If it feels like your edits to the roxygen comments aren’t having an effect, double check that you have actually regenerated the .Rd files with devtools::document() and that you’ve loaded your package. When you call ?function, you should see “Rendering development documentation …”.
To summarize, there are four steps in the basic roxygen2 workflow:
Add roxygen2 comments to your
.Rfiles.Run
devtools::document()or press Ctrl/Cmd + Shift + D to convert roxygen2 comments to.Rdfiles.Preview documentation with
?function.Rinse and repeat until the documentation looks the way you want.
16.1.2 roxygen2 comments, blocks, and tags
Now that you understand the basic workflow, we’ll go into more detail about the syntax. roxygen2 comments start with #' and all the roxygen2 comments preceding a function are collectively called a block. Blocks are broken up by tags, which look like @tagName tagValue, and the content of a tag extends from the end of the tag name to the start of the next tag5. A block can contain text before the first tag which is called the introduction. By default, each block generates a single documentation topic, i.e. a single .Rd file6 in the man/ directory .
Throughout this chapter we’ll show you roxygen2 comments from real tidyverse packages, focusing on stringr, since the functions there tend to be fairly straightforward, leading to documentation that’s understandable with relatively little context. We attach stringr here so that its functions are hyperlinked in the rendered book (more on that in section Section 16.1.3).
Here’s a simple first example: the documentation for str_unique().
#' Remove duplicated strings
#'
#' `str_unique()` removes duplicated values, with optional control over
#' how duplication is measured.
#'
#' @param string Input vector. Either a character vector, or something
#'  coercible to one.
#' @param ... Other options used to control matching behavior between duplicate
#'   strings. Passed on to [stringi::stri_opts_collator()].
#' @returns A character vector, usually shorter than `string`.
#' @seealso [unique()], [stringi::stri_unique()] which this function wraps.
#' @examples
#' str_unique(c("a", "b", "c", "b", "a"))
#'
#' # Use ... to pass additional arguments to stri_unique()
#' str_unique(c("motley", "mötley", "pinguino", "pingüino"))
#' str_unique(c("motley", "mötley", "pinguino", "pingüino"), strength = 1)
#' @export
str_unique <- function(string, ...) {
  ...
}
Here the introduction includes the title (“Remove duplicated strings”) and a basic description of what the function does. The introduction is followed by five tags: two @params, one @returns, one @seealso, one @examples, and one @export.
Note that the block has an intentional line length (typically the same as that used for the surrounding R code) and the second and subsequent lines of the long @param tag are indented, which makes the entire block easier to scan. You can get more roxygen2 style advice in the tidyverse style guide.
TipRStudio
It can be aggravating to manually manage the line length of roxygen comments, so be sure to try out Code > Reflow Comment (Ctrl/Cmd+Shift+/).
Note also that the order in which tags appear in your roxygen comments (or even in handwritten .Rd files) does not dictate the order in rendered documentation. The order of presentation is determined by tooling within base R.
The following sections go into more depth for the most important tags. We start with the introduction, which provides the title, description, and details. Then we cover the inputs (the function arguments), outputs (the return value), and examples. Next we discuss links and cross-references, then finish off with techniques for sharing documentation between topics.
16.1.3 Key markdown features
For the most part, general markdown and R Markdown knowledge suffice for taking advantage of markdown in roxygen2. But there are a few pieces of syntax that are so important we want to highlight them here. You’ll see these in many of the examples in this chapter.
Backticks for inline code: Use backticks to format a piece of text as code, i.e. in a fixed width font. Example:
#' I like `thisfunction()`, because it's great.Square brackets for an auto-linked function: Enclose text like somefunction() and somepackage::somefunction() in square brackets to get an automatic link to that function’s documentation. Be sure to include the trailing parentheses, because it’s good style and and it causes the function to be formatted as code, i.e. you don’t need to add backticks. Example:
#' It's obvious that `thisfunction()` is better than [otherpkg::otherfunction()]
#' or even our own [olderfunction()].Vignettes: If you refer to a vignette with an inline call to vignette("some-topic"), it serves a dual purpose. First, this is literally the R code you would execute to view a vignette locally. But wait there’s more! In many rendered contexts, this automatically becomes a hyperlink to that same vignette in a pkgdown website. Here we use that to link to some very relevant vignettes7:
Lists: Bullet lists break up the dreaded “wall of text” and can make your documentation easier to scan. You can use them in the description of the function or of an argument and also for the return value. It is not necessary to include a blank line before the list, but that is also allowed.
#' Best features of `thisfunction()`:
#' * Smells nice
#' * Has good vibes
16.2 Title, description, details
The introduction provides a title, description, and, optionally, details, for the function. While it’s possible to use explicit tags in the introduction, we usually rely on implicit tags when possible:
The title is taken from the first sentence. It should be written in sentence case, not end in a full stop, and be followed by a blank line. The title is shown in various function indexes (e.g.
help(package = "somepackage")) and is what the user will usually see when browsing multiple functions.The description is taken from the next paragraph. It’s shown at the top of documentation and should briefly describe the most important features of the function.
Additional details are anything after the description. Details are optional, but can be any length so are useful if you want to dig deep into some important aspect of the function. Note that, even though the details come right after the description in the introduction, they appear much later in rendered documentation.
The following sections describe each component in more detail, and then discuss a few useful related tags.
16.2.1 Title
When writing the title, it’s useful to think about how it will appear in the reference index. When a user skims the index, how will they know which functions will solve their current problem? This requires thinking about what your functions have in common (which doesn’t need to be repeated in every title) and what is unique to that function (which should be highlighted in the title).
When we wrote this chapter, we found the function titles for stringr to be somewhat disappointing. But they provide a useful negative case study:
-
str_detect(): Detect the presence or absence of a pattern in a string -
str_extract(): Extract matching patterns from a string -
str_locate(): Locate the position of patterns in a string -
str_match(): Extract matched groups from a string
There’s a lot of repetition (“pattern”, “from a string”) and the verb used for the function name is repeated in the title, so if you don’t understand the function already, the title seems unlikely to help much. Hopefully we’ll have improved those titles by the time you read this!
In contrast, these titles from dplyr are much better8:
-
mutate(): Create, modify, and delete columns -
summarise(): Summarise each group down to one row -
filter(): Keep rows that match a condition -
select(): Keep or drop columns using their names and types -
arrange(): Order rows using column values
Here we try to succinctly describe what the function does, making sure to describe whether it affects rows, columns, or groups. We do our best to use synonyms, instead of repeating the function name, to hopefully give folks another chance to understand the intent of the function.
16.2.2 Description
The purpose of the description is to summarize the goal of the function, usually in a single paragraph. This can be challenging for simple functions, because it can feel like you’re just repeating the title of the function. Try to find a slightly different wording, if you can. It’s okay if this feels a little repetitive; it’s often useful for users to see the same thing expressed in two different ways. It’s a little extra work, but the extra effort is often worth it. Here’s the description for str_detect():
#' Detect the presence/absence of a match
#'
#' `str_detect()` returns a logical vector with `TRUE` for each element of
#' `string` that matches `pattern` and `FALSE` otherwise. It's equivalent to
#' `grepl(pattern, string)`.
If you want more than one paragraph, you must use an explicit @description tag to prevent the second (and subsequent) paragraphs from being turned into the @details. Here’s a two-paragraph @description from str_view():
#' View strings and matches
#'
#' @description
#' `str_view()` is used to print the underlying representation of a string and
#' to see how a `pattern` matches.
#'
#' Matches are surrounded by `<>` and unusual whitespace (i.e. all whitespace
#' apart from `" "` and `"\n"`) are surrounded by `{}` and escaped. Where
#' possible, matches and unusual whitespace are coloured blue and `NA`s red.
Here’s another example from str_like(), which has a bullet list in @description:
#' Detect a pattern in the same way as `SQL`'s `LIKE` operator
#'
#' @description
#' `str_like()` follows the conventions of the SQL `LIKE` operator:
#'
#' * Must match the entire string.
#' * `_` matches a single character (like `.`).
#' * `%` matches any number of characters (like `.*`).
#' * `\%` and `\_` match literal `%` and `_`.
#' * The match is case insensitive by default.
Basically, if you’re going to include an empty line in your description, you’ll need to use an explicit @description tag.
Finally, it’s often particularly hard to write a good description if you’ve just written the function, because the purpose often seems very obvious. Do your best, and then come back later, when you’ve forgotten exactly what the function does. Once you’ve re-derived what the function does, you’ll be able to write a better description.
16.2.3 Details
The @details are just any additional details or explanation that you think your function needs. Most functions don’t need details, but some functions need a lot. If you have a lot of information to convey, it’s a good idea to use informative markdown headings to break the details up into manageable sections9. Here’s an example from dplyr::mutate(). We’ve elided some of the details to keep this example short, but you should still get a sense of how we used headings to break up the content in to skimmable chunks:
#' Create, modify, and delete columns
#'
#' `mutate()` creates new columns that are functions of existing variables.
#' It can also modify (if the name is the same as an existing
#' column) and delete columns (by setting their value to `NULL`).
#'
#' @section Useful mutate functions:
#'
#' * [`+`], [`-`], [log()], etc., for their usual mathematical meanings
#'
#' ...
#'
#' @section Grouped tibbles:
#'
#' Because mutating expressions are computed within groups, they may
#' yield different results on grouped tibbles. This will be the case
#' as soon as an aggregating, lagging, or ranking function is
#' involved. Compare this ungrouped mutate:
#'
#' ...
This is a good time to remind ourselves that, even though a heading like Useful mutate functions in the example above comes immediately after the description in the roxygen block, the content appears much later in the rendered documentation. The details (whether they use section headings or not) appear after the function usage, arguments, and return value.
16.3 Arguments
For most functions, the bulk of your work will go towards documenting how each argument affects the output of the function. For this purpose, you’ll use @param (short for parameter, a synonym of argument) followed by the argument name and a description of its action.
The highest priority is to provide a succinct summary of the allowed inputs and what the parameter does. For example, here’s how str_detect() documents string:
#' @param string Input vector. Either a character vector, or something
#'  coercible to one.
And here are three of the arguments to str_flatten():
#' @param collapse String to insert between each piece. Defaults to `""`.
#' @param last Optional string to use in place of the final separator.
#' @param na.rm Remove missing values? If `FALSE` (the default), the result
#'   will be `NA` if any element of `string` is `NA`.
Note that @param collapse and @param na.rm describe their default arguments. This is often a good practice because the function usage (which shows the default values) and the argument description are often quite far apart in the rendered documentation. But there are downsides. The main one is that this duplication means you’ll need to make updates in two places if you change the default value; we believe this small amount of extra work is worth it to make the life of the user easier.
If an argument has a fixed set of possible parameters, you should list them. If they’re simple, you can just list them in a sentence, like in str_trim():
#' @param side Side on which to remove whitespace: `"left"`, `"right"`, or
#'   `"both"` (the default).
If they need more explanation, you might use a bulleted list, as in str_wrap():
#' @param whitespace_only A boolean.
#'   * `TRUE` (the default): wrapping will only occur at whitespace.
#'   * `FALSE`: can break on any non-word character (e.g. `/`, `-`).
The documentation for most arguments will be relatively short, often one or two sentences. But you should take as much space as you need, and you’ll see some examples of multi-paragraph argument docs shortly.
16.3.1 Multiple arguments
If the behavior of multiple arguments is tightly coupled, you can document them together by separating the names with commas (with no spaces). For example, x and y are interchangeable in str_equal(), so they’re documented together:
#' @param x,y A pair of character vectors.In str_sub(), start and end define the range of characters to replace. But instead of supplying both, you can use just start if you pass in a two-column matrix. So it makes sense to document them together:
#' @param start,end A pair of integer vectors defining the range of characters
#'   to extract (inclusive).
#'
#'   Alternatively, instead of a pair of vectors, you can pass a matrix to
#'   `start`. The matrix should have two columns, either labelled `start`
#'   and `end`, or `start` and `length`.
In str_wrap(), indent and exdent define the indentation for the first line and all subsequent lines, respectively:
#' @param indent,exdent A non-negative integer giving the indent for the
#'   first line (`indent`) and all subsequent lines (`exdent`).
16.3.2 Inheriting arguments
If your package contains many closely related functions, it’s common for them to have arguments that share the same name and meaning. It would be both annoying and error prone to copy and paste the same @param documentation to every function, so roxygen2 provides @inheritParams which allows you to inherit argument documentation from another function, possibly even in another package.
stringr uses @inheritParams extensively because most functions have string and pattern arguments. The detailed and definitive documentation belongs to str_detect():
#' @param string Input vector. Either a character vector, or something
#'  coercible to one.
#' @param pattern Pattern to look for.
#'
#'   The default interpretation is a regular expression, as described in
#'   `vignette("regular-expressions")`. Use [regex()] for finer control of the
#'   matching behaviour.
#'
#'   Match a fixed string (i.e. by comparing only bytes), using
#'   [fixed()]. This is fast, but approximate. Generally,
#'   for matching human text, you'll want [coll()] which
#'   respects character matching rules for the specified locale.
#'
#'   Match character, word, line and sentence boundaries with
#'   [boundary()]. An empty pattern, "", is equivalent to
#'   `boundary("character")`.
Then the other stringr functions use @inheritParams str_detect to get this detailed documentation for string and pattern without having to duplicate that text.
@inheritParams only inherits docs for arguments that the function actually uses and that aren’t already documented, so you can document some arguments locally and inherit others. str_match() uses this to inherit str_detect()’s standard documentation for the string argument, while providing its own specialized documentation for pattern:
#' @inheritParams str_detect
#' @param pattern Unlike other stringr functions, `str_match()` only supports
#'   regular expressions, as described `vignette("regular-expressions")`.
#'   The pattern should contain at least one capturing group.
Now that we’ve discussed default values and inheritance we can bring up one more dilemma. Sometimes there’s tension between giving detailed information on an argument (acceptable values, default value, how the argument is used, etc.) and making the documentation amenable to reuse in other functions (which might differ in some specifics). This can motivate you to assess whether it’s truly worth it for related functions to handle the same input in different ways or if standardization would be beneficial.
You can inherit documentation from a function in another package by using the standard :: notation, i.e. @inheritParams anotherpackage::function. This does introduce one small annoyance: now the documentation for your package is no longer self-contained and the version of anotherpackage can affect the generated docs. Beware of spurious diffs introduced by contributors who run devtools::document() with a different installed version of the inherited-from package.
16.4 Return value
A function’s output is as important as its inputs. Documenting the output is the job of the @returns10 tag. Here the priority is to describe the overall “shape” of the output, i.e. what sort of object it is, and its dimensions (if that makes sense). For example, if your function returns a vector you might describe its type and length, or if your function returns a data frame you might describe the names and types of the columns and the expected number of rows.
The @returns documentation for functions in stringr is straightforward because almost all functions return some type of vector with the same length as one of the inputs. For example, here’s how str_like() describes its output:
#' @returns A logical vector the same length as `string`.A more complicated case is the joint documentation for str_locate() and str_locate_all()11. str_locate() returns an integer matrix, and str_locate_all() returns a list of matrices, so the text needs to describe what determines the rows and columns.
#' @returns
#' * `str_locate()` returns an integer matrix with two columns and
#'   one row for each element of `string`. The first column, `start`,
#'   gives the position at the start of the match, and the second column, `end`,
#'   gives the position of the end.
#'
#'* `str_locate_all()` returns a list of integer matrices with the same
#'   length as `string`/`pattern`. The matrices have columns `start` and `end`
#'   as above, and one row for each match.
#' @seealso
#'   [str_extract()] for a convenient way of extracting matches,
#'   [stringi::stri_locate()] for the underlying implementation.
In other cases it can be easier to figure out what to highlight by thinking about the set of functions and how they differ. For example, most dplyr functions return a data frame, so just saying @returns A data frame is not very useful. Instead, we tried to identify exactly what makes each function different. We decided it makes sense to describe each function in terms of how it affects the rows, the columns, the groups, and the attributes. For example, this describes the return value of dplyr::filter():
#' @returns
#' An object of the same type as `.data`. The output has the following properties:
#'
#' * Rows are a subset of the input, but appear in the same order.
#' * Columns are not modified.
#' * The number of groups may be reduced (if `.preserve` is not `TRUE`).
#' * Data frame attributes are preserved.
@returns is also a good place to describe any important warnings or errors that the user might see. For example readr::read_csv() mentions what happens if there are any parsing problems:
#' @returns A [tibble()]. If there are parsing problems, a warning will alert you.
#'   You can retrieve the full details by calling [problems()] on your dataset.
WarningSubmitting to CRAN
For your initial CRAN submission, all functions must document their return value. While this may not be scrutinized in subsequent submissions, it’s still a good practice. There’s currently no way to check that you’ve documented the return value of every function (we’re working on it) which is why you’ll notice some tidyverse functions lack output documentation. But we certainly aspire to provide this information across the board.
16.5 Examples
Describing what a function does is great, but showing how it works is even better. That’s the role of the @examples tag, which uses executable R code to demonstrate what a function can do. Unlike other parts of the documentation where we’ve focused mainly on what you should write, here we’ll briefly give some content advice and then focus mainly on the mechanics.
The main dilemma with examples is that you must jointly satisfy two requirements:
Your example code should be readable and realistic. Examples are documentation that you provide for the benefit of the user, i.e. a real human, working interactively, trying to get their actual work done with your package.
Your example code must run without error and with no side effects in many non-interactive contexts over which you have limited or no control, such as when CRAN runs
R CMD checkor when your package website is built via GitHub Actions.
It turns out that there is often tension between these goals and you’ll need to find a way to make your examples as useful as you can for users, while also satisfying the requirements of CRAN (if that’s your goal) or other automated infrastructure.
The mechanics of examples are complex because they must never error and they’re executed in four different situations:
- Interactively using the
example()function. - During
R CMD checkon your computer, or another computer you control (e.g. in GitHub Actions). - During
R CMD checkrun by CRAN. - When your pkgdown website is being built, often via GitHub Actions or similar.
After discussing what to put in your examples, we’ll talk about keeping your examples self-contained, how to display errors if needed, handling dependencies, running examples conditionally, and alternatives to the @examples tag for including example code.
TipRStudio
When preparing .R scripts or .Rmd / .qmd reports, it’s handy to use Ctrl/Cmd + Enter or the Run button to send a line of R code to the console for execution. Happily, you can use the same workflow for executing and developing the @examples in your roxygen comments. Remember to do devtools::load_all() often, to stay synced with the package source.
16.5.1 Contents
Use examples to first show the basic operation of the function, then to highlight any particularly important properties. For example, str_detect() starts by showing a few simple variations and then highlights a feature that’s easy to miss: as well as passing a vector of strings and one pattern, you can also pass one string and vector of patterns.
#' @examples
#' fruit <- c("apple", "banana", "pear", "pineapple")
#' str_detect(fruit, "a")
#' str_detect(fruit, "^a")
#' str_detect(fruit, "a$")
#'
#' # Also vectorised over pattern
#' str_detect("aecfg", letters)
Try to stay focused on the most important features without getting into the weeds of every last edge case: if you make the examples too long, it becomes hard for the user to find the key application that they’re looking for. If you find yourself writing very long examples, it may be a sign that you should write a vignette instead.
There aren’t any formal ways to break up your examples into sections but you can use sectioning comments that use many --- to create a visual breakdown. Here’s an example from tidyr::chop():
#' @examples
#' # Chop ----------------------------------------------------------------------
#' df <- tibble(x = c(1, 1, 1, 2, 2, 3), y = 1:6, z = 6:1)
#' # Note that we get one row of output for each unique combination of
#' # non-chopped variables
#' df %>% chop(c(y, z))
#' # cf nest
#' df %>% nest(data = c(y, z))
#'
#' # Unchop --------------------------------------------------------------------
#' df <- tibble(x = 1:4, y = list(integer(), 1L, 1:2, 1:3))
#' df %>% unchop(y)
#' df %>% unchop(y, keep_empty = TRUE)
Strive to keep the examples focused on the specific function that you’re documenting. If you can make the point with a familiar built-in dataset, like mtcars, do so. If you find yourself needing to do a bunch of setup to create a dataset or object to use in the example, it may be a sign that you need to create a package dataset or even a helper function. See Chapter 7, Section 7.3.2, and Section 15.1.1 for ideas. Making it easy to write (and read) examples will greatly improve the quality of your documentation.
Also, remember that examples are not tests. Examples should be focused on the authentic and typical usage you’ve designed for and that you want to encourage. The test suite is the more appropriate place to exhaustively exercise all of the arguments and to explore weird, pathological edge cases.
16.5.2 Leave the world as you found it
Your examples should be self-contained. For example, this means:
- If you modify
options(), reset them at the end of the example. - If you create a file, create it somewhere in
tempdir(), and make sure to delete it at the end of the example. - Don’t change the working directory.
- Don’t write to the clipboard (unless a user is present to provide some form of consent).
This has a lot of overlap with our recommendations for tests (see section Section 14.2.2) and even for the R functions in your package (see section Section 6.5). However, due to the way that examples are run during R CMD check, the tools available for making examples self-contained are much more limited. Unfortunately, you can’t use the withr package or even on.exit() to schedule clean up, like restoring options or deleting a file. Instead, you’ll need to do it by hand. If you can avoid doing something that must then be undone, that is the best way to go and this is especially true for examples.
These constraints are often in tension with good documentation, if you’re trying to document a function that somehow changes the state of the world. For example, you have to “show your work”, i.e. all of your code, which means that your users will see all of the setup and teardown, even if it is not typical for authentic usage. If you’re finding it hard to follow the rules, this might be another sign to switch to a vignette (see Chapter 17).
WarningSubmitting to CRAN
Many of these constraints are also mentioned in the CRAN repository policy, which you must adhere to when submitting to CRAN. Use find in page to locate “malicious or anti-social” to see the details.
Additionally, you want your examples to send the user on a short walk, not a long hike. Examples need to execute relatively quickly so users can quickly see the results, it doesn’t take ages to build your website, automated checks happen quickly, and it doesn’t take up computing resources when submitting to CRAN.
WarningSubmitting to CRAN
All examples must run in under 10 minutes.
16.5.3 Errors
Your examples cannot throw any errors, so don’t include flaky code that can fail for reasons beyond your control. In particular, it’s best to avoid accessing websites, because R CMD check will fail whenever the website is down.
What can you do if you want to include code that causes an error for the purposes of teaching? There are two basic options:
-
You can wrap the code in
try()so that the error is shown, but doesn’t stop execution of the examples. For example,dplyr::bind_cols()usestry()to show you what happens if you attempt to column-bind two data frames with different numbers of rows:#' @examples #' ... #' # Row sizes must be compatible when column-binding #' try(bind_cols(tibble(x = 1:3), tibble(y = 1:2))) -
You can wrap the code in
\dontrun{}12, so it is never run byexample(). The example above would look like this if you used\dontrun{}instead oftry().#' # Row sizes must be compatible when column-binding #' \dontrun{ #' bind_cols(tibble(x = 1:3), tibble(y = 1:2))) #' }
We generally recommend using try() so that the reader can see an example of the error in action.
WarningSubmitting to CRAN
For the initial CRAN submission of your package, all functions must have at least one example and the example code can’t all be wrapped inside \dontrun{}. If the code can only be run under specific conditions, use the techniques below to express those pre-conditions.
16.5.4 Dependencies and conditional execution
An additional source of errors in examples is the use of external dependencies: you can only use packages in your examples that your package formally depends on (i.e. that appear in Imports or Suggests). Furthermore, example code is run in the user’s environment, not the package environment, so you’ll have to either explicitly attach the dependency with library() or refer to each function with ::. For example, dbplyr is a dplyr extension package, so all of its examples start with library(dplyr):
#' @examples
#' library(dplyr)
#' df <- data.frame(x = 1, y = 2)
#'
#' df_sqlite <- tbl_lazy(df, con = simulate_sqlite())
#' df_sqlite %>% summarise(x = sd(x, na.rm = TRUE)) %>% show_query()
In the past, we recommended only using code from suggested packages inside a block like this:
#' @examples
#' if (requireNamespace("suggestedpackage", quietly = TRUE)) {
#'   # some example code
#' }
We no longer believe that approach is a good idea, because:
- Our policy is to expect that suggested packages are installed when running
R CMD check13 and this informs what we do in examples, tests, and vignettes. - The cost of putting example code inside
{ … }is high: you can no longer see intermediate results, such as when the examples are rendered in the package’s website. The cost of a package not being installed is low: users can usually recognize the associated error and resolve it themselves, i.e. by installing the missing package.
In other cases, your example code may depend on something other than a package. For example, if your examples talk to a web API, you probably only want to run them for an authenticated user, and never want such code to run on CRAN. In this case, you really do need conditional execution. The entry-level solution is to express this explicitly:
#' @examples
#' if (some_condition()) {
#'   # some example code
#' }
The condition could be quite general, such as interactive(), or very specific, such as a custom predicate function provided by your package. But this use of if() still suffers from the downside highlighted above, where the rendered examples don’t clearly show what’s going on inside the { … } block.
The @examplesIf tag is a great alternative to @examples in this case:
#' @examplesIf some_condition()
#' some_other_function()
#' some_more_functions()
This looks almost like the snippet just above, but has several advantages:
Users won’t actually see the
if() { … }machinery when they are reading your documentation from within R or on a pkgdown website. Users only see realistic code.The example code renders fully in pkgdown.
The example code runs when it should and does not run when it should not.
This doesn’t run afoul of CRAN’s prohibition of putting all your example code inside
\dontrun{}.
For example, googledrive uses @examplesIf in almost every function, guarded by googledrive::drive_has_token(). Here’s how the examples for googledrive::drive_publish() begin:
#' @examplesIf drive_has_token()
#' # Create a file to publish
#' file <- drive_example_remote("chicken_sheet") %>%
#'   drive_cp()
#'
#' # Publish file
#' file <- drive_publish(file)
#' ...
The example code doesn’t run on CRAN, because there’s no token. It does run when the pkgdown site is built, because we can set up a token securely. And, if a normal user executes this code, they’ll be prompted to sign in to Google, if they haven’t already.
16.5.5 Intermixing examples and text
An alternative to examples is to use R Markdown code blocks elsewhere in your roxygen comments, either ```R if you just want to show some code, or ```{r} if you want the code to be run. These can be effective techniques but there are downsides to each:
- The code in
```Rblocks is never run; this means it’s easy to accidentally introduce syntax errors or to forget to update it when your package changes. - The code in
```{r}blocks is run every time you document the package. This has the nice advantage of including the output in the documentation (unlike examples), but the code can’t take very long to run or your iterative documentation workflow will become quite painful.
16.6 Re-using documentation
roxygen2 provides a number of features that allow you to reuse documentation across topics. They are documented in vignette("reuse", package = "roxygen2"), so here we’ll focus on the three most important:
- Documenting multiple functions in one topic.
- Inheriting documentation from another topic.
- Using child documents to share prose between topics, or to share between documentation topics and vignettes.
16.6.1 Multiple functions in one topic
By default, each function gets its own documentation topic, but if two functions are very closely connected, you can combine the documentation for multiple functions into a single topic. For example, take str_length() and str_width(), which provide two different ways of computing the size of a string. As you can see from the description, both functions are documented together, because this makes it easier to see how they differ:
#' The length/width of a string
#'
#' @description
#' `str_length()` returns the number of codepoints in a string. These are
#' the individual elements (which are often, but not always letters) that
#' can be extracted with [str_sub()].
#'
#' `str_width()` returns how much space the string will occupy when printed
#' in a fixed width font (i.e. when printed in the console).
#'
#' ...
str_length <- function(string) {
  ...
}
To merge the two topics, str_width() uses @rdname str_length to add its documentation to an existing topic:
#' @rdname str_length
str_width <- function(string) {
  ...
}
This technique works best for functions that have a lot in common, i.e. similar return values and examples, in addition to similar arguments.
16.6.2 Inheriting documentation
In other cases, functions in a package might share many related behaviors, but aren’t closely enough connected that you want to document them together. We’ve discussed @inheritParams above, but there are three variations that allow you to inherit other things:
@inherit source_functionwill inherit all supported components fromsource_function().@inheritSection source_function Section titlewill inherit the single section with title “Section title” fromsource_function().@inheritDotParamsautomatically generates parameter documentation for...for the common case where you pass...on to another function.
See https://roxygen2.r-lib.org/articles/reuse.html#inheriting-documentation for more details.
16.6.3 Child documents
Finally, you can reuse the same .Rmd or .md document in the function documentation, README.Rmd, and vignettes by using R Markdown child documents. The syntax looks like this:
#' ```{r child = "man/rmd/filename.Rmd"}
#' ```
This is a feature we use very sparingly in the tidyverse, but one place we do use it is in dplyr, because a number of functions use the same syntax as select() and we want to provide all the info in one place:
#' # Overview of selection features
#'
#' ```{r, child = "man/rmd/overview.Rmd"}
#' ```
Then man/rmd/overview.Rmd contains the repeated markdown:
Tidyverse selections implement a dialect of R where operators make
it easy to select variables:

- `:` for selecting a range of consecutive variables.
- `!` for taking the complement of a set of variables.
- `&` and `|` for selecting the intersection or the union of two
  sets of variables.
- `c()` for combining selections.

...
If the Rmd file contains roxygen (Markdown-style) links to other help topics, then some care is needed. See https://roxygen2.r-lib.org/dev/articles/reuse.html#child-documents for details.
16.7 Help topic for the package
This chapter focuses on function documentation, but remember you can document other things, as detailed in vignette("rd-other", package = "roxygen2"). In particular, you can create a help topic for the package itself by documenting the special sentinel "_PACKAGE". The resulting .Rd file automatically pulls in information parsed from the DESCRIPTION, including title, description, list of authors, and useful URLs. This help topic appears alongside all your other topics and can also be accessed with package?pkgname, e.g. package?usethis, or even just ?usethis.
We recommend calling usethis::use_package_doc() to set up this package-level documentation in a dummy file R/{pkgname}-package.R, whose contents will look something like this:
#' @keywords internal
"_PACKAGE"
The R/{pkgname}-package.R file is the main reason we wanted to mention use_package_doc() and package-level documentation here. It turns out there are a few other package-wide housekeeping tasks for which this file is a very natural home. For example, it’s a sensible, central location for import directives, i.e. for importing individual functions from your dependencies or even entire namespaces. In Section 11.4.1, we recommend importing specific functions via usethis::use_import_from() and this function is designed to write the associated roxygen tags into the R/{pkgname}-package.R file created by use_package_doc(). So, putting it all together, this is a minimal example of how the R/{pkgname}-package.R file might look:
#' @keywords internal
"_PACKAGE"

# The following block is used by usethis to automatically manage
# roxygen namespace tags. Modify with care!
## usethis namespace: start
#' @importFrom glue glue_collapse
## usethis namespace: end
NULL
The name “roxygen” is a nod to the Doxygen documentation generator, which inspired the development of an R package named roxygen. Then that original concept was rebooted as roxygen2, similar to ggplot2.↩︎
The NAMESPACE file is also generated from these roxygen comments. Or, rather, it can be and that is the preferred devtools workflow (Section 11.3).↩︎
Running
devtools::document()also affects another field inDESCRIPTION, which looks like this:RoxygenNote: 7.2.1. This records which version of roxygen2 was last used in a package, which makes it easier for devtools (and its underlying packages) to make an intelligent guess about when to re-document()a package and when to leave well enough alone. In a collaborative setting, this also reduces nuisance changes to the.Rdfiles, by making the relevant roxygen2 version highly visible.↩︎This is part of the explanation promised in Section 9.8, where we also clarify that, with our current conventions, this field should really be called
Config/Needs/roxygen, instead ofRoxygen. We highly recommend that you use markdown in all new packages and that you migrate older-but-actively maintained packages to markdown syntax. In this case, you can callusethis::use_roxygen_md()to updateDESCRIPTIONand get a reminder about the roxygen2md package, which can help with conversion.↩︎Or the end of the block, if it’s the last tag.↩︎
The name of the file is automatically derived from the object you’re documenting.↩︎
These calls include an explicit specification of
package = "somepackage", since it can’t be inferred from context, i.e. the context is a Quarto book, not package documentation.↩︎Like all the examples, these might have changed a bit since we wrote this book, because we’re constantly striving to do better. You might compare what’s in the book to what we now use, and consider if you think if it’s an improvement.↩︎
In older code, you might see the use of
@section title:which was used to create sections before roxygen2 had full markdown support. If you’ve used these in the past, you can now turn them into markdown headings.↩︎For historical reasons, you can also use
@return, but we now favor@returnsbecause it reads more naturally.↩︎We’ll come back how to document multiple functions in one topic in Section 16.6.1.↩︎
You used to be able to use
\donttest{}for a similar purpose, but we no longer recommend it because CRAN sets a special flag that causes the code to be executed anyway.↩︎This is certainly true for CRAN and is true in most other automated checking scenarios, such as our GitHub Actions workflows.↩︎